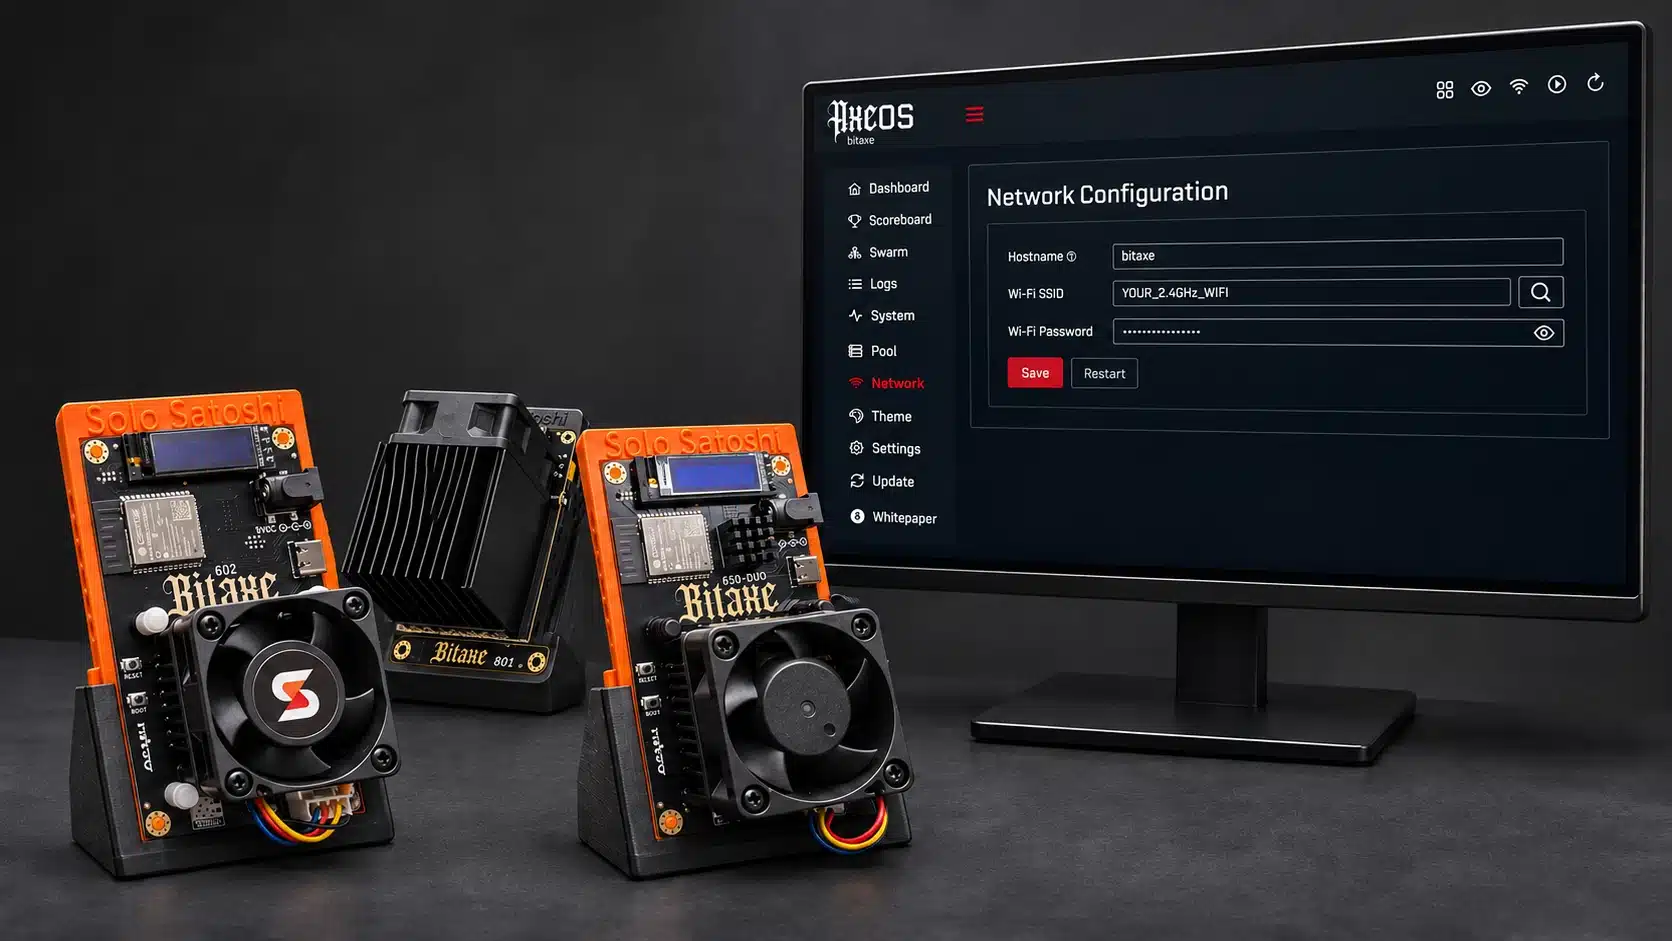
To set up your Bitaxe, connect the correct mining power supply, join its temporary setup Wi-Fi, save your home network details, and configure a mining pool with your own Bitcoin receiving address. Finish by checking the fan, temperatures, pool connection, and accepted shares in AxeOS.
This guide covers setup across the Bitaxe family, with browser instructions for compatible AxeOS firmware and a separate path for touchscreen controllers. The screenshots use a Gamma 601 as the example. Check your model’s power requirements before connecting it, and replace the example network and pool entries with your own details.
Quick overview
- Match the power input first: 5 V and 12 V models need different supplies. USB used for programming is not a substitute for the specified mining-power connection.
- Use the miner’s temporary Wi-Fi for onboarding: connect to the exact Bitaxe network shown on its display, stay connected despite the no-internet message, and open
http://192.168.4.1if the portal does not appear. - Join a reachable 2.4 GHz network: enter the SSID and password exactly. After saving, reconnect your phone or computer to the home LAN and open the miner’s assigned local IP.
- Choose the reward method deliberately: solo mining and shared-reward mining can use different ports at the same provider. Accepted solo shares do not create regular Bitcoin payments.
- Replace factory payout details: enter your own supported on-chain receiving address in the primary and any configured address-based fallback pool. A worker suffix identifies the miner; it does not replace the payout address.
- Verify actual work: look for sustained nonzero hashrate, working cooling, a pool connection, and an increasing accepted-share counter. A paused miner, an invalid address, or a disconnected pool needs attention before setup is complete.
Watch the Setup Video
The Solo Satoshi setup video follows the power, Wi-Fi, AxeOS, and pool-configuration workflow. Use the controls available in your installed firmware and the provider’s current connection details when labels or endpoints differ.
Watch the Bitaxe setup walkthrough on YouTube
1. Check the Model and Power Input
Read the model or board revision and the required input voltage before connecting the supply. Match voltage, polarity, connector, and adequate continuous capacity; a plug that fits does not establish electrical compatibility.
| Model or family | Mining-power input | Setup path |
|---|---|---|
| Ultra 200 series | 5 V DC barrel input; verify the exact board and polarity. | Browser-based AxeOS Wi-Fi setup on compatible builds. |
| Supra 400 series | 5 V DC barrel input; use the supply specified for the board. | Browser-based AxeOS Wi-Fi setup on compatible builds. |
| Gamma 600 series, including 601 and 602 | 5 V DC, center-positive barrel input on the documented Gamma boards. | The illustrated browser workflow in this guide. |
| Gamma Duo 650 | 5 V barrel input. Two ASICs do not imply a 12 V supply. | Compatible AxeOS browser workflow; confirm its board-specific supply capacity. |
| GT 801 | 12 V XT30 system; verify the specified supply and cable. | Compatible AxeOS browser workflow. |
| Turbo Touch | 12 V XT30 system; verify the installed hardware. | Use the touchscreen-first setup guide, including the screen controller’s own Wi-Fi connection. |
| Naja Duo 1201 | 12 V XT30 system; use its specified supply configuration. | Compatible AxeOS browser workflow with the correct model firmware. |
| Other boards, controller variants, or firmware forks | Check that manufacturer’s exact specification. | Follow its documented onboarding path; do not infer compatibility from the Bitaxe name. |

The Gamma hardware documentation specifies its 5 V input and center-positive barrel connector. Do not connect a 12 V supply to that input. For supply selection and exposed-terminal installation details, use the Mean Well power-supply guide.
Have your 2.4 GHz Wi-Fi name and password, a phone or computer, your chosen pool’s current connection details, and an on-chain Bitcoin receiving address ready. Keep the board on its stand, dry, ventilated, and clear of conductive objects.
2. Power On and Find the Setup Network
Connect the correct mining supply, allow the controller to start, and read the setup-network name on the display. A new or unconfigured compatible board typically offers a temporary network named Bitaxe_ followed by its own identifier.

Use the exact suffix displayed by your unit. If it already shows a home-network IP address, it may already be configured; continue at step 7 instead of resetting it. A reset-button press is not a required extra step after every normal power-on.
3. Connect to the Bitaxe Wi-Fi
Open Wi-Fi settings on your phone or computer and select the Bitaxe network that matches the display. Accept the option to stay connected or use the network without internet access when your operating system offers it.
iPhone or iPad
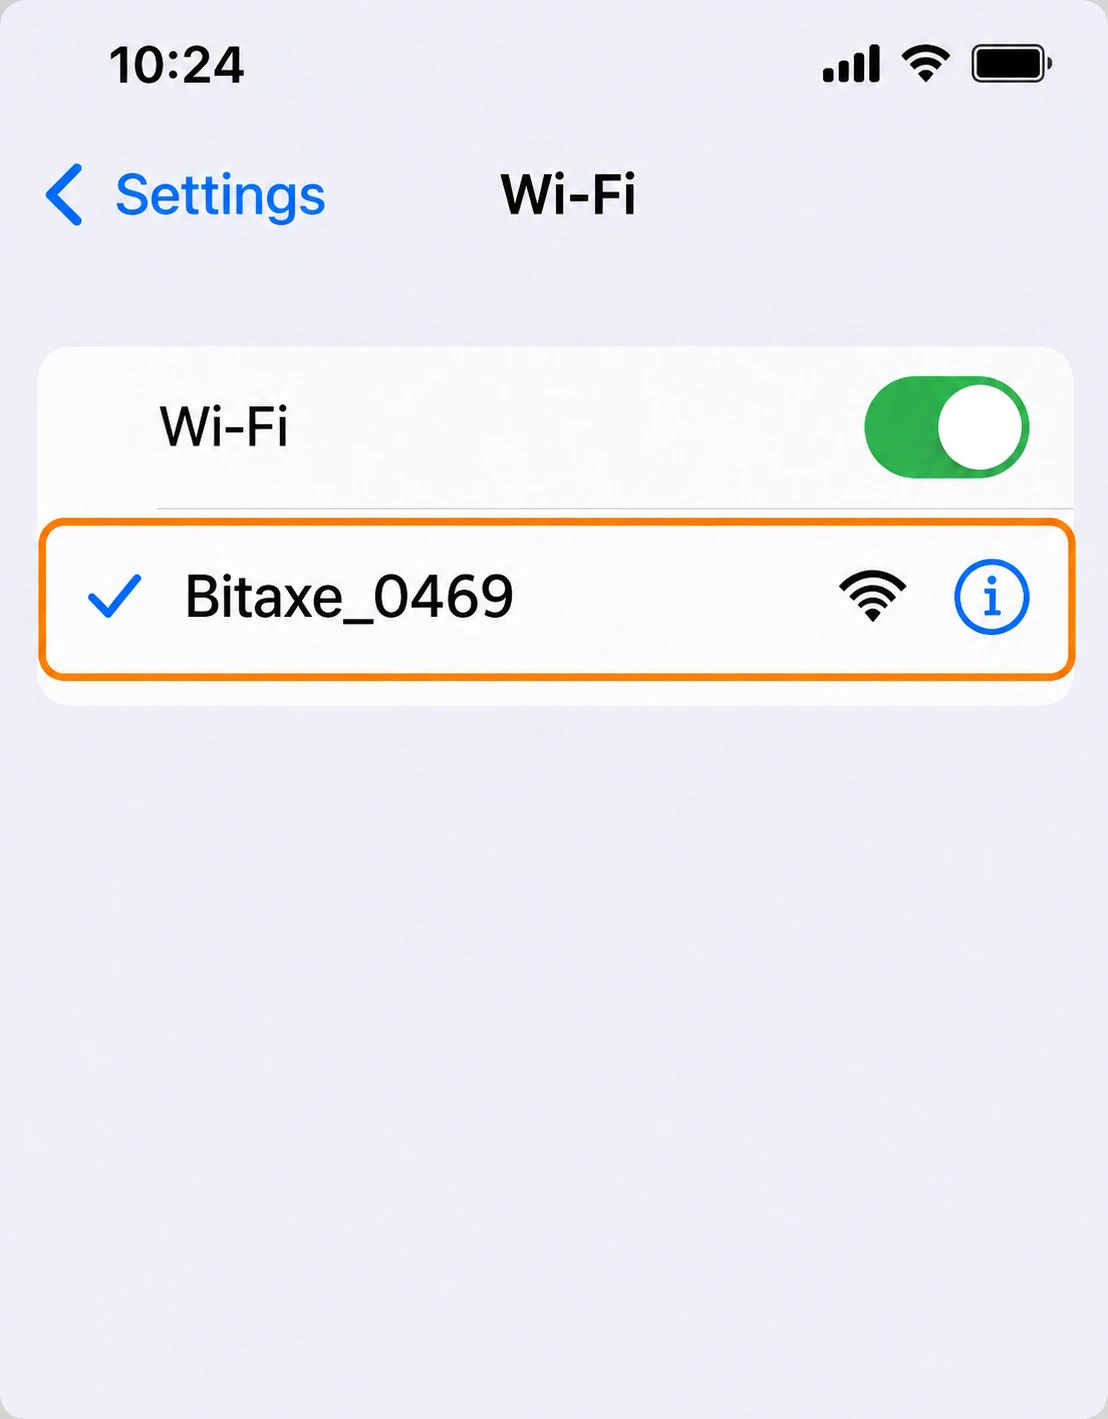
Open Settings, select Wi-Fi, and choose the miner’s network. If a no-internet message appears, keep the local Wi-Fi connection so Safari can reach the setup page.
Android
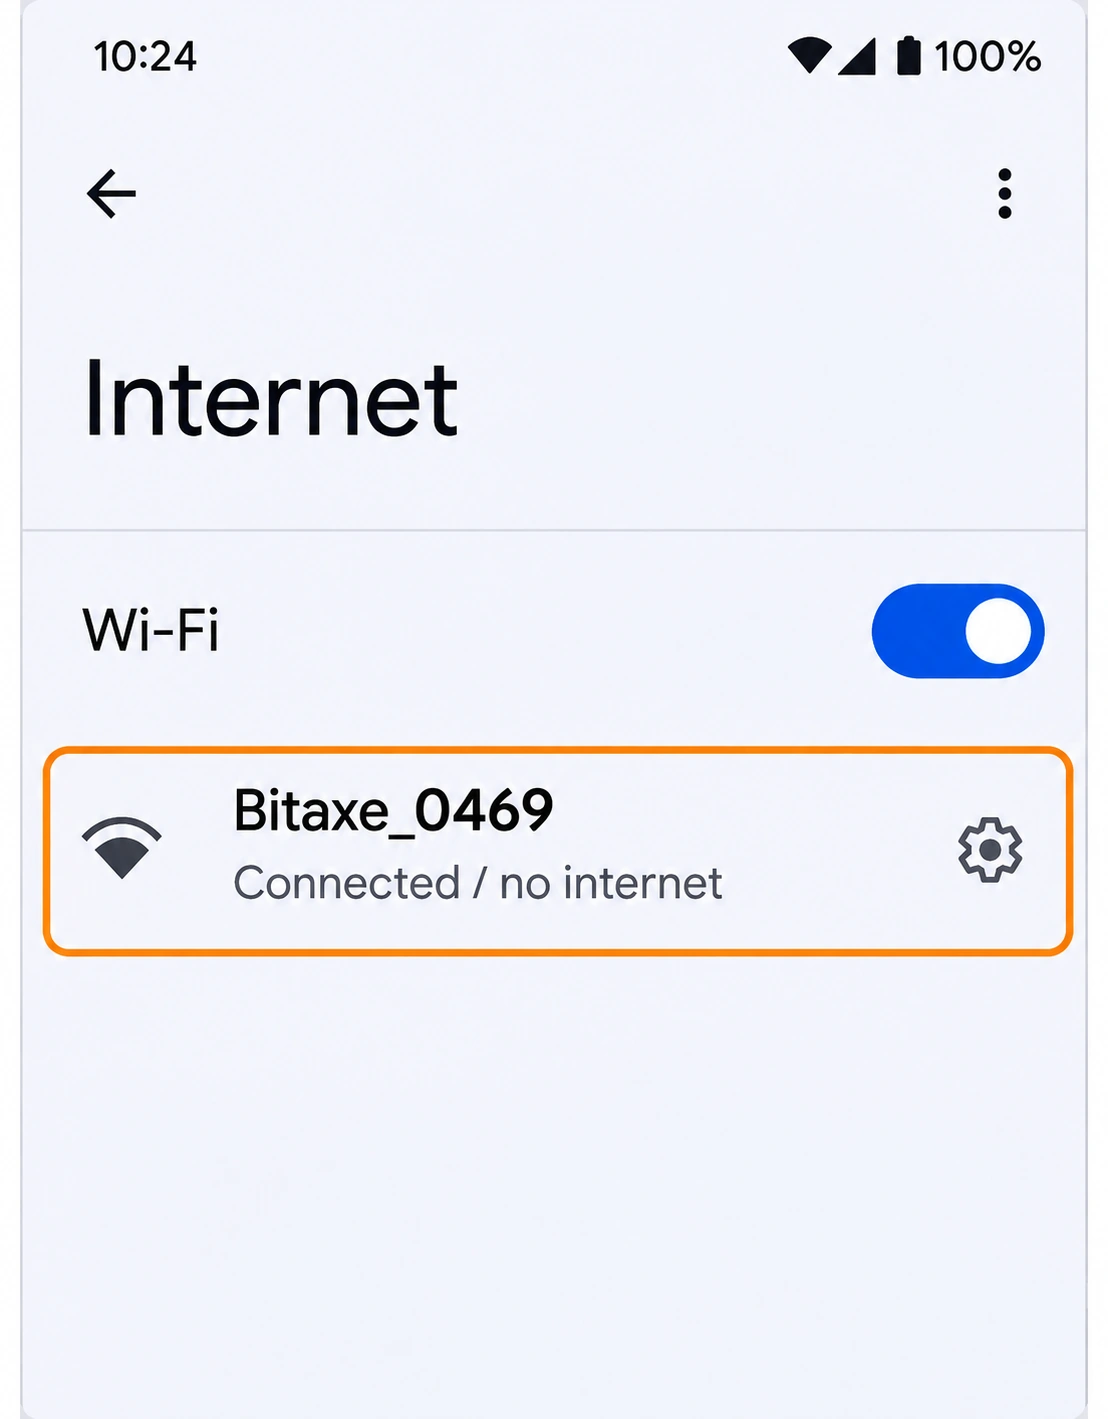
Open Settings, choose Network & internet, then Internet, and select the miner’s network. Menu names vary by manufacturer. If prompted, stay connected or use the network without internet.
Windows
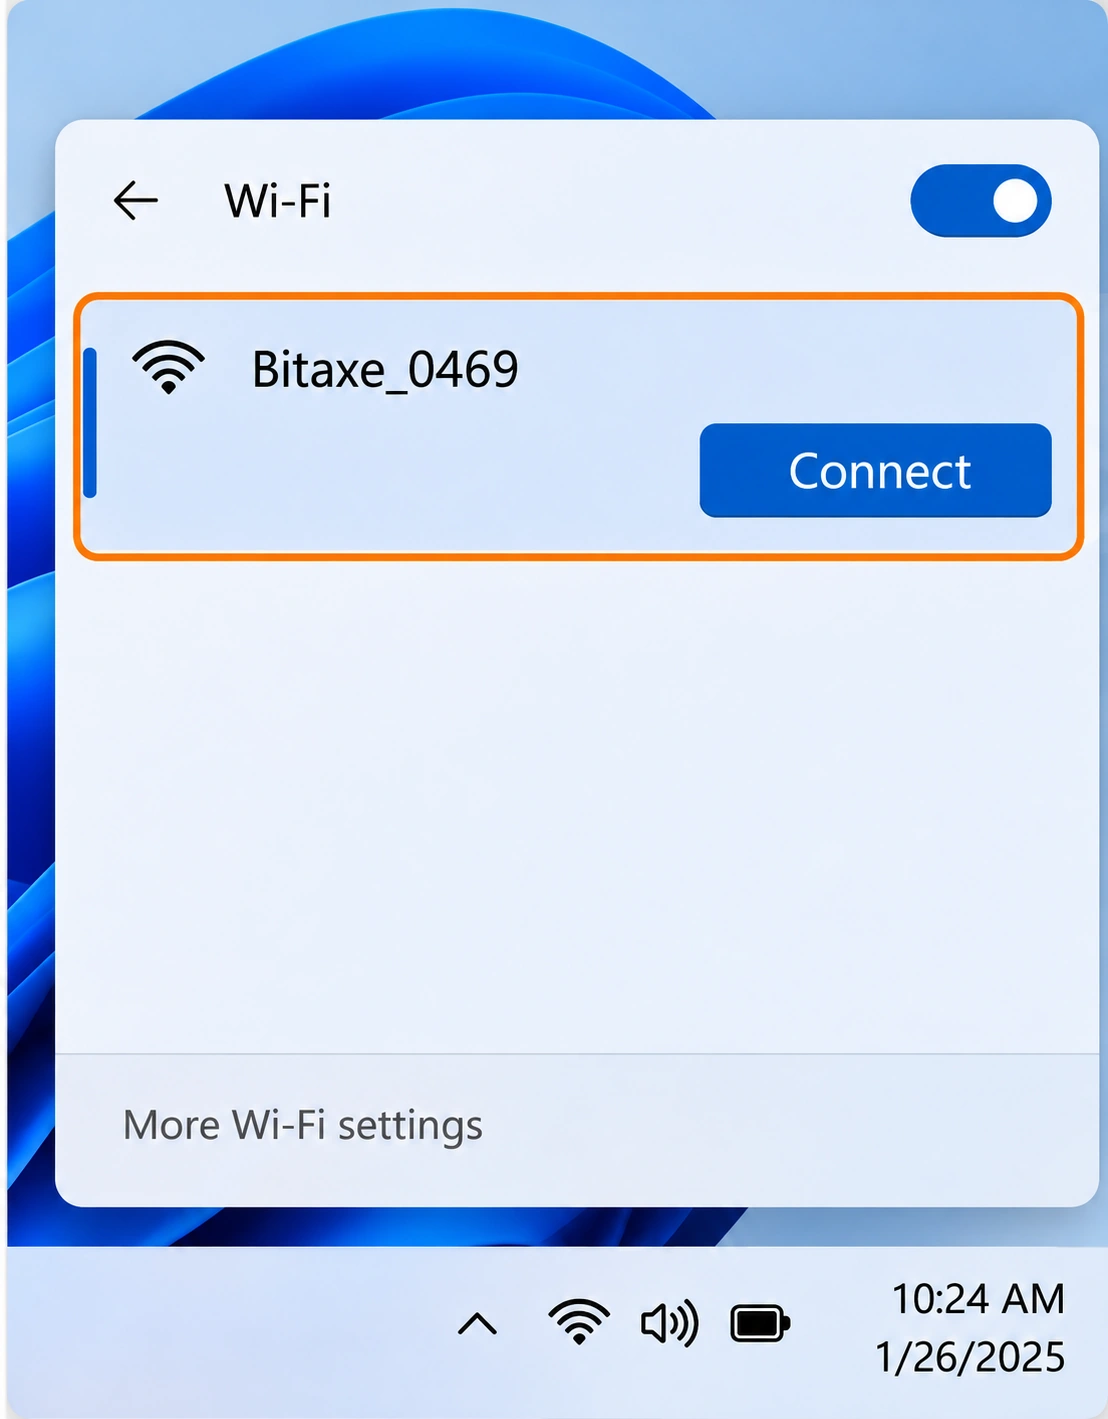
Open the taskbar’s network controls, select the control beside Wi-Fi to show available networks, choose the matching Bitaxe SSID, and select Connect. The no-internet status is expected during local setup.
Mac
Open Wi-Fi from Control Center or the menu bar. Expand Other Networks if needed, choose the matching Bitaxe network, and remain connected while opening its local setup page.
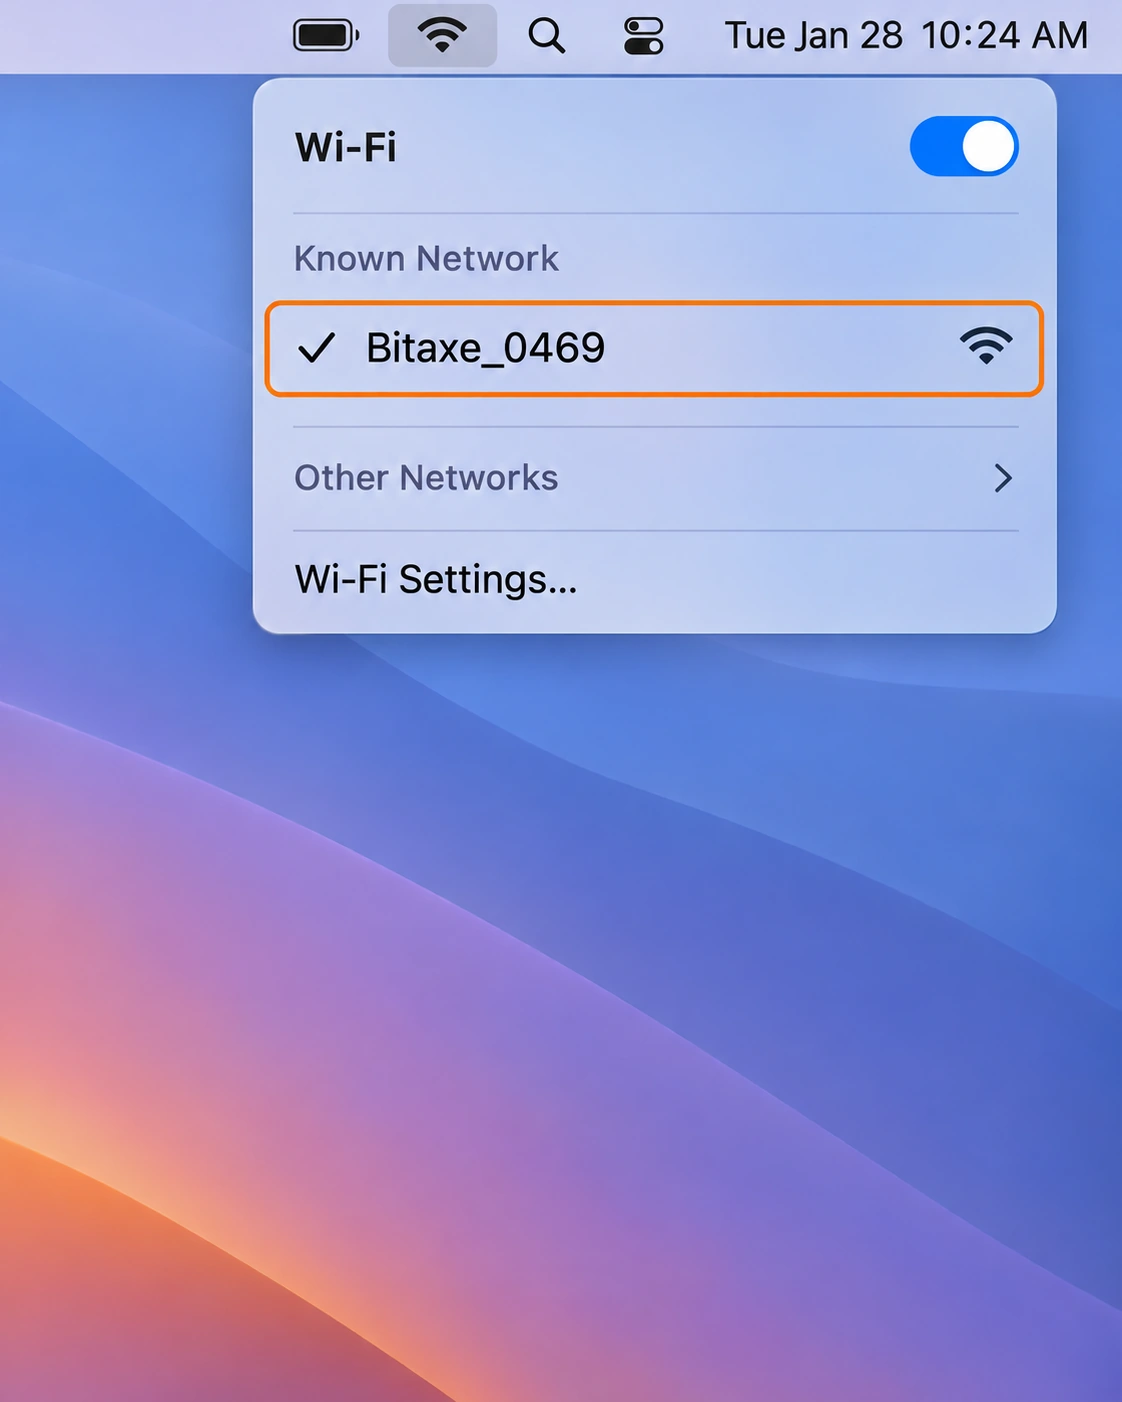
If the phone keeps switching away from the setup network, return to Wi-Fi settings and reconnect. A mobile-data or VPN route can interfere with local access; first confirm that the browser is actually using the miner’s local connection.
4. Open the Setup Page
Open the captive setup window, or type http://192.168.4.1 directly into the browser’s address bar while connected to the Bitaxe Wi-Fi. The temporary address is for onboarding; it is not the address you normally use after the miner joins your home network.
http://192.168.4.1
If AxeOS opens on another page, select Network. Avoid typing the address into a search box: searching for the number will not connect to the miner.
5. Enter Your Home Wi-Fi Details
Enter your home network’s exact 2.4 GHz SSID and password in Network Configuration. Use the scan button beside the SSID field when available, or type the name exactly, including capitalization and spaces.

YOUR_2.4GHz_WIFI is a placeholder for your own network name. Enter the Wi-Fi password, not a wallet password. Leave the hostname unchanged unless you deliberately want a different local device name.
The miner’s Wi-Fi radio must support the selected network band. Your phone or computer can use 5 GHz after setup if that network is bridged to the same reachable LAN. A controlled IoT network is also suitable when its rules allow the required management and mining connections.
6. Save and Reconnect to Your Home Network
Select Save, wait for confirmation, and use Restart when the installed interface requests or enables it. Then reconnect your phone or computer to your home network.

Save comes before Restart. A disabled Restart control can become available after a successful save. The setup page may stop responding while the miner changes networks; reopen it at the assigned home-network IP rather than repeatedly saving the temporary setup page.
If the credentials are rejected, reconnect to the miner’s setup network when it becomes available and correct the SSID or password. Do not factory-reset a reachable miner merely because its old browser tab lost contact during the network change.
7. Find the Local IP and Open AxeOS
Read the IP address on the miner’s display or find its entry in your router’s connected-device list, then open that address in the browser. Your phone or computer must be allowed to reach the miner on the local network.
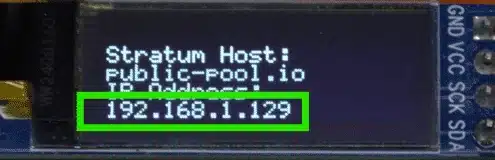
http://192.168.1.129The display example uses 192.168.1.129; another device or router can assign a different address. Guest isolation, client isolation, or a VPN route can prevent access even when both devices have internet service. Do not expose AxeOS through router port forwarding.
A reachable hostname.local name can be convenient where mDNS works, but the assigned IP is the direct fallback. If the IP later changes, check the display or router again. A router DHCP reservation can keep the address consistent.
8. Choose Your Pool and Reward Method
Select the service and reward method before entering its host and port. Solo mining pays for a valid block found by your setup under the service’s terms; shared-reward mining allocates rewards according to the pool’s payout rules.
The illustrated primary connection is Public Pool’s Stratum V1 solo endpoint. Its operator connection page also lists a separate PPLNS endpoint, while Solo CKPool’s documentation lists its own address-based solo connection.
| Service and method | Host | Port | Important distinction |
|---|---|---|---|
| Public Pool, solo | public-pool.io |
3333 |
The operator currently advertises no pool fee. Accepted shares are not regular solo payments. |
| Public Pool, PPLNS | public-pool.io |
13333 |
Shared-reward mining based on recent valid work. Read current payout rules and thresholds. |
| Solo CKPool, solo | stratum.ckpool.org |
3333 |
The operator currently states a 2% fee. The example fallback uses this service. |
These are the operators’ published Stratum V1 connection examples checked on November 12, 2026. Recheck the provider’s instructions if a connection fails. The TLS and Stratum V2 endpoints use their own settings; do not enable a different protocol or TLS mode while keeping an unrelated plaintext port.

In Pool, enter the hostname in Stratum Host, the number in Stratum Port, and select Stratum V1 for these examples. Do not paste a website address, a dashboard URL, or :3333 into the host field when the port has its own box. Leave advanced options at the provider-supported defaults unless its instructions require a change.
For the wider choices, the solo-mining pool comparison explains selection criteria. The mining-pool explanation covers reward methods in more detail.
9. Enter Your Receiving Address
Replace the primary pool’s factory User value with a supported on-chain Bitcoin receiving address from a wallet you control. For the illustrated address-based services, you may append a worker name such as .Bitaxe1 where the operator supports it.

Replace YOUR_BITCOIN_ADDRESS with your actual receiving address; do not enter that placeholder literally. The example YOUR_BITCOIN_ADDRESS.Bitaxe1 shows the address and worker format. The worker suffix identifies the machine, and the address before the dot determines the payout destination.
The pool password is a mining-connection field, commonly x where the operator accepts it; it is not your wallet password. An account-based pool may instead require account.worker and its own payout configuration. Follow that service’s exact instructions.

If AxeOS warns that the default factory address is still in use, setup is not ready for your payouts. Never enter seed words or a private key in AxeOS. A Lightning invoice or Lightning address is not a substitute for the supported on-chain receiving address in this example. See the Bitcoin wallet guide if you still need a wallet.
10. Check the Fallback Pool
Configure a fallback only if you want the miner to switch services when its primary connection fails. Replace its sample payout details too, and confirm that its reward method and fees are acceptable.

The example fallback is Solo CKPool at stratum.ckpool.org, port 3333, Stratum V1, with your own receiving address and an optional worker suffix. Its fee and solo-reward behavior still apply when it is the fallback. Do not assume two pools have interchangeable usernames or payout rules.
Some AxeOS versions show separate primary and fallback fields; others show numbered pool cards and pool-selection controls. Confirm which configured pool is selected as primary and which, if any, is selected or enabled as fallback.
11. Save the Pool Settings
Select Save after reviewing the host, port, protocol, and payout identity for each pool you intend to use. Follow the interface’s restart prompt or enablement, then reopen AxeOS if the page disconnects.

Return to Pool after the change and confirm that the intended values remain saved and the primary selection is correct. If the miner is using fallback, inspect the primary connection rather than assuming the displayed hashrate proves your preferred pool is receiving the work.
12. Verify Hashrate, Cooling, and Accepted Shares
Setup is complete when the miner is connected to the intended pool, performing sustained hashing, adequately cooled, and submitting accepted work. Check the payout identity as well: a healthy hashrate does not prove the correct person will receive a reward.

Hashrate: allow startup and averaging time, then look for sustained nonzero work. The displayed rate fluctuates, and the expected rate depends on the exact ASIC, chip count, frequency, and firmware. The example readings are not a target for every model.

Cooling: confirm that the fan is turning, the ASIC reading is valid, and available regulator readings are sensible. Use 60–65°C as the preferred ASIC operating target, with lower temperatures acceptable. This is a practical target, not a manufacturer-wide limit or a requirement to make a cooler-running miner hotter.

Accepted shares: observe the counter over time or confirm work on the chosen provider’s dashboard. Share arrivals depend on hashrate and assigned difficulty, so there is no fixed interval that every miner must meet. Accepted shares mean submitted work met the pool’s share target; they do not mean a Bitcoin block was found.
Keep frequency and core voltage at the correct defaults while establishing normal operation. If you later choose to tune performance, use the Bitaxe overclocking guide. ASIC-error readings and rejected shares describe different things; the ASIC-error explanation helps separate them.
Troubleshoot by Symptom
Identify whether the failure is power, Wi-Fi, local access, pool authentication, or hashing before changing settings. Record the exact message, board revision, firmware version, and last successful step; changing several unrelated controls makes the cause harder to isolate.
The Bitaxe setup Wi-Fi is missing
First check whether the miner already displays a home-network IP address. A configured miner may no longer offer its temporary setup network; open the assigned IP instead of assuming onboarding has failed.
If it is unconfigured, check the correct supply, startup messages, and the device-specific recovery instructions. Move nearby for setup. Do not erase settings or flash firmware merely because the Wi-Fi list has not refreshed.
Wi-Fi reports “No AP found” or a password error
Recheck the exact SSID, supported 2.4 GHz band, password, and signal strength. “No AP found” is not proof of one particular typing mistake; hidden SSIDs, band settings, coverage, and router configuration can also matter.
Keep intentional spaces and capitalization where they belong. If your network uses a captive login, enterprise authentication, or an incompatible security configuration, use a network configuration supported by the miner. A brief test on an owner-controlled compatible hotspot can help separate the miner from the home router, but it changes the network configuration.
The setup page or local AxeOS address will not open
Use 192.168.4.1 on the temporary Bitaxe connection and the assigned LAN IP after home Wi-Fi is saved. Confirm which network your phone or computer is currently using, then check routing, VPN access to the LAN, and client-isolation rules.
Keep router security enabled while diagnosing the actual blocked connection. ASUS AiProtection is not a universal cause of Bitaxe Wi-Fi failure. Its official Network Protection documentation describes the controls and event information; use a narrowly scoped exception only for a verified false positive.
The screen is blank
Confirm the correct supply and whether the miner itself is running, then disconnect power before touching a removable display. Check alignment and seating gently; do not bend pins or force a connector.
Some displays are fixed or soldered and should not be pulled off. A blank OLED does not by itself prove the entire miner is dead: check the router for a connected device or use support guidance for the exact board.
Wi-Fi works, but the pool will not connect
Verify the operator’s hostname, port, protocol, TLS choice, and required username format. A web-dashboard URL is not necessarily the Stratum endpoint, and a successful Wi-Fi connection does not establish that the mining service is reachable.
Read the actual rejection or connection error. Check DNS, outbound filtering, and the operator’s status. Keep router protections in place unless logs establish a specific false positive. The Bitaxe mining-log guide explains how to identify the relevant messages.
AxeOS says “Mining is paused”
A paused miner is not actively hashing even though its controller remains reachable. Confirm the correct payout configuration, supply, and cooling before selecting Resume Mining if the pause was intentional and operation is appropriate.
Do not treat a paused ASIC’s unavailable temperature reading as proof of a failed chip. Check the explicit paused state, overheat indication, and surrounding messages before deciding what the reading means.
The fan stops, temperatures rise, or a power fault appears
Stop adding load and investigate the actual fault before repeatedly restarting the device. A stopped or obstructed required fan, inadequate supply, damaged cable, poor cooler contact, or blocked airflow can prevent normal operation.
Disconnect power before checking connectors or mounting. Use the Bitaxe and NerdAxe cooling guide for the matching hardware. Protection behavior depends on the board and firmware; it is not a substitute for a working cooling and power system.
Hashrate stays at zero or the self-test fails
Check for a paused state, startup progress, the exact self-test error, pool work, and the correct model configuration. Record the fault before considering one normal power-cycle with the correct supply and unchanged supported defaults.
Do not try random ASIC types, board profiles, voltages, or firmware files. If recovery is needed, follow the verified Bitaxe firmware update and USB recovery guide. For a unit that starts only into recovery or cannot open normal AxeOS, use the Bitaxe recovery troubleshooting guide to identify the appropriate recovery path. A factory reset or firmware reinstall is not the first response to every network problem.
Shares are accepted, but no Bitcoin has arrived
Check the selected reward method before expecting a payment. Solo mining does not pay small regular rewards for ordinary shares; shared-reward pools use their own payout accounting and thresholds.
Verify the complete saved payout identity, the active pool, and the operator’s record. The solo-mining explanation covers the difference between contributing work and finding a block. The Bitcoin lottery-mining explanation covers the uncertainty of solo outcomes. A best-difficulty record is not a Bitcoin balance.
After Setup
Keep a record of the model, firmware, local address, pool choice, payout identity, and normal operating readings. Recheck the configuration after a deliberate firmware change, recovery, or pool switch.
Use the complete AxeOS guide for dashboard and advanced settings, and the maintenance guide for routine care. The Bitcoin mining glossary explains unfamiliar terms. Keep private keys and wallet backups separate from miner configuration.
Maintain ventilation, protect wiring and connectors from strain, and keep the device away from liquids, children, pets, and conductive objects. Disconnect power before hardware handling. For smoke, burning smells, or visible electrical damage, stop use and isolate power when safe; do not keep restarting the miner. Follow local e-waste requirements when retiring hardware.
Frequently Asked Questions
Rey
How to know if I win a block?
Matt Howard
The screen will say “BLOCK FOUND”. Also, you will get Bitcoin in your bitcoin wallet. 🙂
john cummins
This is really a kewl device.
John
Thanks for the easy setup guide. I already have my two Gamma Turbos up and solo mining. I’m wondering if there is a notification feature so that if one of my units is lucky enough to solve the block and get the reward, can it email me? I had some Antminers that had that notification feature in their firmware OS. If not, I guess the only way I’ll ever know if my unit gets the block is if bitcoin shows up in my wallet? I’d like my unit to email me if it ever gets the block so that I know to go check my wallet? Thanks in advance.
Matt Howard
That’s correct. It will show up in your wallet if you’re solo mining and find a block!
Kind of like email, but a lot more complicated. 🙂
mill.write.come
I just received my Bitaxe Gamma and setup was a breeze! I’ve mined ~6 hours so far. My wi-fi is set to turn off every night and in doing so, my Bitaxe cannot mine. Any suggestions on a setup where I can continue mining overnight? I’d like to either connect to Ethernet or maybe hotspot my desktop. Not sure how to switch wi-fi networks though. Thanks!
racecar
Quick question…
I have been running it for 20 mins now, and it still shows 0 hashrate. I double checked my valid BTC address, and restarted it a few times just to be sure. Why might this be?
Guggenheim
My bitaxe gamma fan keeps going 25% > 28% back and forth. Can I force it to stay at one speed?
Matt
Yes. You can put the fan in manual mode in settings and set it to any percentage you’d like. Just keep an eye on temps. 🙂
Alan Sebastian
Thanks for the quick setup guide and I believe I’m working now. My quick question is do the default pool setting point to a public pool or solo pool? It seems like public with a backup of solo but it’s been nearly 24 hours and no payment received so makes me wonder. Thanks!
Matt
Hello, the Bitaxe default settings will point to Public-Pool which is a solo mining pool. You can read about the different type of pools here: https://www.solosatoshi.com/understanding-mining-pools-mining-101/
Nicholas Erwin
My gamma was working fine for first 2 months then it started saying:
password error (202) WiFi (for setup)
I have tried restarting my BitAxe and my WiFi router and I am entering the correct WiFi password when I try to reconnect but this error never goes away.
Matt
Hello,
We have your support ticket and will address this in the ticket. 🙂
marc oglio
I just received my gamma bitaxe and on axeos there is this error message : Power Fault Detected. Check your Power Supply.
thanks
Matt
Hello,
Please send a ticket to solosatoshi.com/contact so that we can assist you with this via our secure ticket system.
John
My third one– stoked! But, out of the box it opens on to a black screen with green letters that state “BitAxe Recovery”. It says to upload http://www.bit but nothing at all clear as to what that means or next steps. May I please get a little bit of guidance from this point?
Matt
Hello. We ae sorry to hear that you’re experiencing this. We suspect this could be a firmware issue, which is very easy to fix. Please see our guide on how to flash your firmware HERE. 🙂
Alex
I put in my Robinhood btc receiving address but nothing is coming through. Been having for 2.5 days
Matt
That’s because you’re likley solo mining, which does not pay out a reward unless your devices mines a block. For more on solo mining, you can see HERE. 🙂
Le
Mine says “No AP found” it’s not working or connecting to my wifi
Matt
Hello. Sorry to hear that you’re having this issue. This normally means that your Wi-Fi credentials are entered incorrectly. Please revise these fields and assure there are no spaces, and the correct letters are capitalized.
Jeet
Is it possible to Mine BCH
Matt
Yep!
MonaCo7
Really easy setup. Thanks!
Dennis
Great set up guide! Received mine a few days after ordering. Set up and mining less within 20 minutes of unboxing.
PureCane
what’s the best way to power down for maintenance or to move it?
Matt
You can unplug it. It’s safe to do so. 🙂
Jolannaf
Thanks for the setup help. All works fine. Perfect!!!!
Ld
Excellent piece of equipment arrived fast easy setup just hopping to hit a block some day
Peter
Hello, if I’m solo mining and not participating in a pool, should I just keep the default stratum URL and port#?
Thanks in advance!!
Matt
Hello,
Yes, you can keep the current credentials, and you will be solo mining. We also encourage everyone to run a Bycosin node and mine to their own instance of Public Pool as well.
Fred
Having trouble setting up a Coinbase wallet. Keep getting a authorization failed error in the log screen. Do you know if Coinbase wallets work on this device?
Hunter
It should work. Please make sure that it is a receiving address.
Brent
Love the setup, thank you for the quick delivery. Question: Under settings, what is the stratum port and stratum password function? Do I need to change/personalize these settings? Thanks
Hunter
Thank you! You will only need to change the Stratum port if you’re switching pools. The stratum password is not important. It is just a part of the stratum protocol and is “password”.
Marco
Can i use the btc address with 3xxxxxxxxxx and not bc1xxxxxx ?
Hunter
Yes you can.
Yohann
Thanks for the tutorial!
Small question: do I have to add .bitaxe at the end of my BTC address, on both fields (stratum user and fallback stratum user)? Or only the BTC address?
Best regards!
Hunter
You do not have to. This is for if you want to give your device a worker name.
Romo
When i turn it on i have the message test pass Long press boot what should i do?
Hunter
Yes, long press boot.
Kristopher
Thanks for the setup help
Triphamr
Thanks for this, I’m looking forward to starting when you ship mine to me =)
Hunter
Orders are flying out as fast as possible. Thank you for your patience. 🙂